Once you sign onto a database, you will be shown the Database Explorer window. This shows you all the objects in your database.
What you see in this window will depend on the type of database you are connecting to, and how AQT has been customized . . . the following description is generic, to give a general guide.
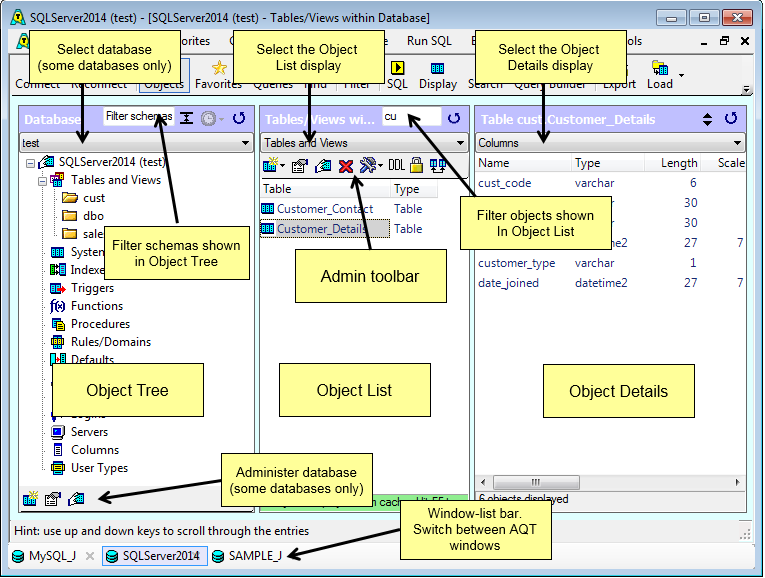
The Database Explorer has three panes:
the Object tree/schemas on the left shows the different types of objects in your database (Tables, Views, Indexes, Triggers etc). When you click on an object, you will be shown all the schemas within that object.
If the system-table query feature is not been enabled, or has not been configured for your database, you will only see Tables, Views and System tables in this object list.
For some databases (SQL Server, Sybase, Informix, MySQL, HP SQL/MX, Netezza), the Database listbox will appear above the object tree. This box lists all databases within the current server – you can select one of these to switch to that database.
the Object list in the middle gridlists all the objects (eg. tables) for a selected object-type.
Above the Object Display is the Admin toolbar; this provides the ability to manage the object selected in the object display. Full use of the Admin Component is limited to the Extended Edition of AQT.
the Object Details in the right gridshows the properties of the object that has been selected in the object display.
Notes:
the objects displayed by the Database Explorer window is different for every database type. This will depend on the way AQT has been configured for the database.
you can set a number of options for the appearance of the Object List and Object Details displays. These are given in the View menu option.
you can set the fonts used in the grids with Options > Database Explorer > Appearance.
you can adjust the pane borders between the grids and resize the screen. These settings are retained from one AQT session to the next.
the grid columns will automatically adjust their width to the size of the data. The section How to use Grids in AQT explains how grid columns are sized.
Using the Object Tree
The object tree shows the different types of objects in your database (Tables, View etc), each represented by a particular icon.
When you click in the object tree on an object icon (such as Table), the high-level grouping of the object is populated. This high-level grouping is called the Owner, Creator or Schema (depending on the terminology of your database). You could think of them as being folders used to group and organize the objects of that object-type (however, unlike files, the objects can’t be moved from one folder to another).
When you click on a Schema in the object tree, the object list will show all the objects (eg. tables) within that Schema.
Some object-types do not have a schema associated with them. Tablespaces and Users are examples of these. When you click on those object icons in the Database Explorer, the object list is populated. The same applies to some “simple” databases (such as Access and MySQL), for which tables do not have a schema.
The object tree can be hidden, to maximize valuable screen real-estate for the two grids. Clicking on the Objects icon in the Toolbar will hide or redisplay the object tree.
the Refresh icon in the toolbar is used to reload the information in the Object Tree from the database. You might do this if, for instance, you have created a new Schema.
If the object tree shows you only “Tables and Views” and “System Tables” then either you are using a database which doesn’t have system tables (eg. Access) or you have not enabled the system-table query feature. This setting is controlled by Options > General > Table Information > Get Table Information from.
Showing Objects, Favorites or Queries
The left pane of the Database Explorer window can show either Objects (as per the above screen-shot), Favorites or Queries. Click on the toolbar buttons Objects / Favorites / Queries to select what is shown in this pane.
If you select neither, the left pane will not be shown. This can be useful for increasing the screen real-estate.
Using the Object List
The Object List shows all the objects within the schema that you selected in the object tree.
Clicking on an object in the Object List will display the details of that object in the Object Details display.
A number of properties of an object can generally be displayed. For instance, for tables you can display the columns in the table, the access list for the table, the views based on that table, the contents of the table, plus much more. Right-click an object in the object list or click the list-box at the top of the object details to see what properties may be displayed. Selecting one of these options will display that property in the object details display.
The options you see when you right-click an object in the object list will depend on the system queries that have been set up for the database. These vary depending on the database type, as each database stores different information in the system tables. If you wish, you can change these queries or set up new ones. The Advanced Customization section explains how. Warning: changes to the system queries can have significant effects on the way AQT works, and should only be made with extreme caution, and only if you are an expert in your database type.
There may be more than one option for what information is displayed in the object list. When this is the case, a listbox displaying the options will appear at the top of the grid.
Some queries may not work if either
you do not have permission to read the system table, or
you are using an old version of the database that is not compatible with the AQT queries.
If you want to move quickly through all the objects in the object list you can use the keyboard's up and down arrows. This is a lot quicker than clicking on the individual objects.
If you type a letter while the focus is on the grid, the display will go to the first entry that begins with that letter.
If you have a large number of items in the object list, you can click on the Find icon to specify a Filter to restrict the objects displayed.
In the Evaluation version of Advanced Query Tool, a maximum of 1000 objects will be shown in the object list.
AQT caches the information in the Object List - this is discussed in more detail later.
You can Refresh the contents of the list by clicking on the Refresh button (above the grid on the right), hitting F5 or clicking on View > Refresh > Middle Grid
Using the Object Details
you can Print the contents of the Object Details display with File > Print Right Grid
you can Copy the contents of the Object Details grid by selecting a range of cells then hitting Ctrl+C
sometimes the Object Details display is text-box rather than a grid (such as display View or Procedure text). In this case, you can right-click the text and select various text functions such as Print, Copy, Copy to File etc
sometimes what is displayed in the Details Display are themselves database objects (indexes, tables etc). This can easily be seen, as the icons will be displayed with the objects. In this case you can right-click an object to get a list of actions you can do with this object. This will include displaying the details of the object, displaying table contents etc.
Using the Administration Toolbar
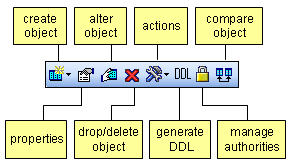
If the Administration Component is active for your database, you will see the Administration Toolbar at the top of the Object List in the middle grid. Once you click on an object, this toolbar will display a number of icons. You may or may not see all these icons, depending on how the Administration Component has been configured for your database.
The create object icon will always be active. The other icons will only be active once you have clicked on an object. Depending on what type of object you have clicked on (table, view etc), different icons will be displayed.
Create object, properties of object and alter object will open the manage table window (if the object is a table), or the manage object window (for other object types).
clicking on drop/delete object will not drop the object immediately. Instead AQT will open the run action on multiple objects window, from which you select the objects you wish to drop.
actions is a drop-down list of various actions you can perform on the object. Clicking on one of these will open the run action on multiple objects window from which you can select which objects you wish to perform the action on.
generate DDL will open the generate DDL window, where you can generate the DDL (the SQL statements that create your object).
manage authorities opens the manage authorities window, where you can specify which users and groups have access to the object, and their security rights.
compare object opens the Compare Objects window, where you can compare the definition of the object to another object (on either this or another database).
Other Database Explorer functions
Object List and Object Details displays
The section How to use Grids in AQT explains many useful functions available in the grids. Others are explained below.
Copying
You can copy the contents of a number of cells by selecting the cells then hitting Ctrl+C or the Copy icon. This is useful to (for instance) copy the names of all your tables (to the clipboard). You can do more advanced copying with the Text Generator feature.
Other displays
These displays require further explanation, available from the links.
View Definition (formatted)
Table Access Grid (for Oracle, Sybase Enterprise and MS SQL Server).
Other menu items
Table > Display Table will display the contents of the table you have selected in the middle grid
Table > Add New Row will take you into the Row Display and Change window, where you can insert a new row into your table
Run SQL opens the Run SQL window where you can analyze a table and run queries against it.
Build Query opens the Query Builder where you can build a query against your table.
Table > Search Table opens the Search Table window where you can build a simple search against your table.